Cost of Repairing vs. Replacing ANSI Pumps: A Comprehensive Analysis

Blog

Top 10 Nail Interlock Techniques You Need to Try?

Nail interlock techniques are essential for nail enthusiasts. They add creativity and elegance to nail art. Exploring different styles can elevate your nail game significantly.

Many people overlook the importance of mastering nail interlock. It’s an art that requires practice and patience. Engaging in this craft can be frustrating. You may not achieve perfection immediately, and that’s okay. Progress over perfection is key.

In this article, we’ll explore ten nail interlock techniques. Each one offers unique possibilities for your nail designs. Embark on this journey with an open mind, ready to embrace the learning process. Let your creativity flow while you try these techniques and improve over time.

Top 10 Nail Interlock Techniques You Need to Try?

Understanding Nail Interlock Techniques

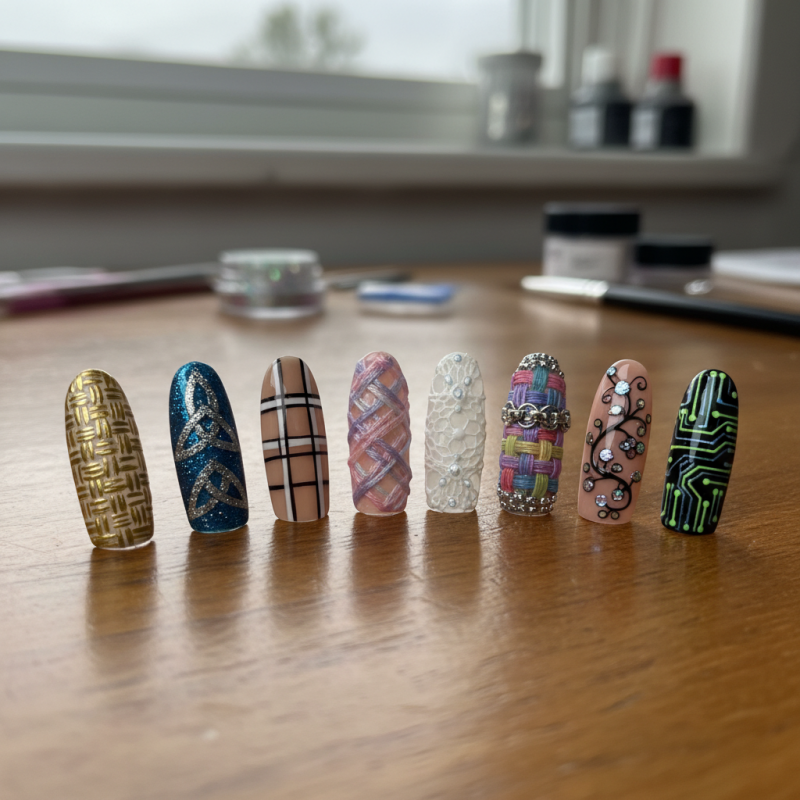
Nail interlock techniques are gaining popularity for their unique styles and creative potential. These methods enable nail artists to blend colors and patterns seamlessly. Each technique offers distinct visual effects and textures. The beauty of nail art lies in experimentation. It can be challenging to master these techniques, but the journey is rewarding.

Understanding nail interlock techniques involves recognizing the different methods. Some techniques utilize ombre effects, while others might combine glitter and matte finishes. For example, the "weave" technique creates an elegant interlaced look. Observing the application can be tricky. Mistakes can lead to uneven lines or color clumps. Embracing imperfections can lead to unexpected beauty.

While practice is essential, don't rush the process. Experimenting allows for personal growth. A simple technique can turn into a masterpiece with patience. Nail interlocking can transform static designs into dynamic art. Focus on details, and remember to reflect on your outcomes. Each attempt, whether successful or flawed, contributes to your growth as an artist.

Essential Tools for Nail Interlock Methods

When exploring nail interlock techniques, having the right tools is crucial. A quality nail file and buffer helps shape and smooth nails effectively. These tools help you achieve that desired finish. An acrylic brush is essential for applying products accurately. Proper brush technique can make a significant difference. You might even find that different brush sizes suit different styles.

Don't forget to use a good nail primer. It helps in creating a strong bond between the natural nail and the enhancements. A topcoat is also necessary, as it adds shine and protects your design. You may need to experiment with various types of topcoats to find what works best for you.

Preparation is equally important. Having a clean workspace can reduce mistakes. Sometimes, a cluttered area leads to accidents. Consider using disposable tools for hygiene. Even simple practices, like washing your hands, can prevent issues. Reflecting on these aspects can enhance your overall experience with nail interlock methods.

Step-by-Step Guide to Each Interlock Technique

Nail interlock techniques can elevate your nail art. These techniques not only create stunning designs but also enhance your creativity. Each method has its unique appeal, and trying different styles can lead to unexpected results.

Start with the classic interlock. Use contrasting colors for a striking look. Apply one color, let it dry, and then layer the second color. This may take practice. Imperfections are common, but they can add character to your work. Try incorporating geometric shapes for added flair. They require precision but yield beautiful outcomes.
Next, explore the spiral interlock. Imagine wrapping colors around each other. Use a thin brush for the best result. This technique can be tricky. It often requires you to fix mistakes several times. Don’t be discouraged if it doesn’t turn out perfectly on the first try. Each attempt takes you closer to mastery. Just remember, the process is as important as the final design.

Common Mistakes and How to Avoid Them

When trying nail interlock techniques, many enthusiasts make common mistakes. One frequent error is not properly preparing the nails. Clean and dry nails allow better adhesion for design. Skipping this step can lead to uneven results. Always ensure your nails are free from oils and dirt.

Another mistake is rushing the process. Nail art requires patience and precision. If you apply layers too quickly, they may smudge or fail to cure properly. Take your time. Allow each layer to dry thoroughly. It can be tempting to move fast, but a little extra wait can enhance the final outcome.

Lastly, forgetting to practice can hinder progress. Some techniques require repeated trials to master. Don’t be discouraged by initial failures. Recognize that perfection takes time. Reflect on what went wrong and adjust your approach. Each attempt is a step toward improvement. Embrace the journey, and don’t shy away from imperfections. They're part of the learning experience.

Top 10 Nail Interlock Techniques You Need to Try - Common Mistakes and How to Avoid Them

Technique Description Common Mistakes Tips to Avoid Mistakes
Basic Interlock A simple overlapping technique that provides basic structure. Not aligning correctly. Use a guide line for precision.
Reverse Interlock A technique that creates a reverse pattern for added interest. Forgetting the reversal. Practice with dummy nails before executing on real nails.
Two-tone Interlock Combines two colors for a striking visual effect. Uneven color application. Ensure even ratios of both colors.
3D Interlock This technique creates a dimensional effect using layering. Overloading product. Use thin layers to build dimension gradually.
Gradient Interlock Transitions between colors create a smooth gradient. Harsh lines between colors. Blend colors while wet for an even transition.
Metallic Interlock Use of metallic polish for a shiny finish. Too thick layers resulting in bubbling. Apply in thin layers and allow to dry.
Floral Interlock Incorporates floral designs into the interlock pattern. Clashing flower colors. Choose complementary colors for floral designs.
Textured Interlock Adds texture for a more tactile experience. Too much texture that overpowers the design. Balance texture with smooth areas.
Glitter Interlock Uses glitter polish for sparkle in the design. Overloading on glitter, making it hard to dry. Apply glitter in thin layers.
Ombre Interlock Creates a fading effect from one color to another. Crusting and uneven fade. Use a sponge to blend colors effectively.

Benefits of Mastering Nail Interlock Techniques

Mastering nail interlock techniques can enhance your nail care routine significantly. These techniques create stunning designs that attract attention. They also improve your dexterity, making you more skilled in nail art. With practice, your confidence will grow. You might encounter challenges initially; that’s okay. Every artist faces hurdles. The key is to keep trying.

One major benefit is the creativity boost. Interlocking techniques open up endless design possibilities. You can experiment with colors and shapes uniquely. This exploration is where growth happens. Mistakes often lead to unexpected beauties. Some designs might not turn out as planned, but those often teach the most valuable lessons. Learning to embrace these imperfections enriches your skill set.

Another advantage is the personal satisfaction gained from improvement. With each technique mastered, you can see tangible progress. Your nails will reflect your evolving style. It’s rewarding to look back and see how far you've come. Sometimes, it may feel like a struggle. However, every attempt refines your artistry, pushing you towards mastery.

Top 10 Nail Interlock Techniques You Need to Try

Mastering various nail interlock techniques can significantly enhance your skills as a nail artist. The chart above illustrates the benefits scores assigned to ten different interlock techniques. Higher scores indicate techniques that are more beneficial for achieving intricate designs and strengthening nails.

Proud Member Of Curry Supply Holdings
Since 1932

Tour Our State-of-the-Art Facility

Click for a Quick Quote